we are know a physiotherapy techiques and physio project,physio related doute aloso we will clear because i am physiotherapy ..........And u want any thin to know you contact me uses of comment,Then you all are suporting me that is very help full for me............
Acoronavirusis a kind of common virus that causes an infection in your nose,sinuses, or upper throat. Most coronaviruses aren't dangerous.
In early 2020, after a December 2019 outbreak in China, the World Health Organization identified SARS-CoV-2 as a new type of coronavirus. The outbreak quickly spread around the world.
COVID-19 is a disease caused by SARS-CoV-2 that can trigger what doctors call a respiratory tract infection. It can affect your upper respiratory tract (sinuses, nose, and throat) or lower respiratory tract (windpipe and lung)
pursed lip breathing
Pursed lip breathing is a breathing technique designed to make your breaths more effective by making them slower and more intentional. You do this after inhaling by puckering your lips and exhaling through them slowly and deliberately, often to a count.
Pursed lip breathing gives you more control over your breathing, which is particularly important for people with lung conditions such as COPD.
Pursed lip breathing can help improve and control your breathing in several ways, including:
relieving shortness of breath by slowing the breath rate
keeping the airways open longer, which decreases the work that goes into breathing
improving ventilation by moving old air (carbon dioxide) trapped in the lungs out and making room for new, fresh oxygen
In addition to the lung benefits you can get from pursed lip breathing, it can also lead to overall relaxation. By taking consistent, deep breaths, you can calm the central nervous system, which has a relaxing effect on your entire body. This can help reduce stress and anxiety.
Start with feet together and arms resting comfortably by your sides. Step forward with your right foot and lower your body until your front knee is at 90 degrees and your knee is not touching the floor. Then, to complete the exercise, push off of your front right foot while straightening your left leg keep your RIGHT foot off of the floor and balance with your right thigh parallel to your hip.
le groups in your lower body, which builds leans muscle and reduces body fat. This can increase your resting metabolism, which allows you to burn more calories and trim excess weight.
If you’re looking to lose weight, push yourself to your outer limits by including lunges in a high-intensity circuit training routine using heavy weights.
2. Balance and stability
Lunges are a lower body unilateral exercise since you work on each side of your body independently. The single-leg movements activate your stabilizing muscles to develop balance, coordination, and stability.
Working one leg at a time causes your body to be less stable, which forces your spine and core to work harder to stay balanced.
3. Alignment and symmetry
Lunges are better than bilateral exercises for rehabilitation since they can correct imbalances and misalignments in your body to make it more symmetrical.
If you have one side that’s less strong or flexible, spend a bit of extra time working on this side so you don’t overcompensate or overuse the dominant side.
4. Stand taller
Lunges strengthen your back and core muscles without putting too much stress or strain on your spine. A strong, stable core reduces your chance of injury and improves your posture, making common movements easier.
Stationary lunges target your glutes, quadriceps, and hamstrings. You’ll put most of your weight on your front leg and use your back leg to balance, stabilize, and support your entire body.
You’ll want to get the form down since stationary lunges are the foundation for all the lunge variations.
6. Side lunges
Lateral lunges develop balance, stability, and strength. They work your inner and outer thighs and may even help to reduce the appearance of cellulite.
Side lunges train your body to move side to side, which is a nice change from your body’s normal forward or twisting movements. Plus, side lunges target your quadriceps, hips, and legs at a slightly different angle, thus working them a little differently.
Pay attention to the outsides of your legs and work on activating these muscles as you do these lunges.
7. Walking lunges
To do walking lunges, you’ll need balance and coordination. The walking variation targets your core, hips, and glutes, and improves overall stability. They also increase your range of motion and help to improve your functional everyday movements.
To make walking lunges more difficult, add weights or a torso twist.
8. Reverse lunges
Reverse lunges activate your core, glutes, and hamstrings. They put less stress on your joints and give you a bit more stability in your front leg. This is ideal for people who have knee concerns, difficulty balancing, or less hip mobility.
Reverse lunges allow you to be more balanced as you move backward, changing up the direction from most of your movements and training your muscles to work differently.
9. Twist lunges
You can add a twist to stationary, walking, or reverse lunges to activate your core and glutes more deeply. Twisting lunges also require balance and stability as you twist your torso away from your lower body while maintaining the alignment of your knees.
You’ll also activate the muscles in your ankles and feet.
10. Curtsy lunge
Curtsy lunges are great for strengthening and toning your derriere, which is excellent for your posture. Strong glutes also prevent and relieve back and knee pain, all of which help to improve your athletic performance and lower your risk of injury.
Curtsy lunges also sculpt and strengthen your hip abductors, quadriceps, and hamstrings as well as improve hip stabilization. Use a kettle bell or dumbbell to up the intensity of this variation.
Lunges and squats both work your lower body and are a valuable addition to your fitness regime. You may favor lunges if you have low back pain since they’re less likely to strain your back. Consider focusing on squats if you feel more stable in this position.
Since this pair of exercises will work your body in similar ways, it’s a matter of personal preference to see if either exercise feels better for your body or brings you the best results. Of course, adding both lunges and squats to your routine is beneficial.
The bridge (also called a hip raise or extension) will strengthen your glutes and hamstrings, while also working your abdominals, back and inner thighs. For a fun variation, lift your hips with your feet flat on the floor and slowly extend one leg long into the sky.
The basic bridge isolates and strengthens your gluteus (butt) muscles and hamstrings (back of the thigh). When done correctly, the move can also enhance core stability by targeting your abdominal muscles and the muscles of lower back and hip.
If you have a workout routine already, it's easy to add the bridge in or pair it with other moves to create your own full-body workout. It's also a good warm-up exercise and a basic rehab exercise to improve core and spinal stabilization.
Benefits
If you're looking for a move to add to your routine that works your core and your butt, the basic bridge is a great place to start.
For this move, the target muscle is the erector spinae which runs the length of your back from your neck to tailbone. A basic bridge stretches the stabilizers of the posterior chain, including your hip abductors, gluteus maximus, and hamstrings.
As antagonist stabilizers for the bridge move, the rectus abdominis, obliques, and quadriceps get a workout as they maintain stability.
Your overall strength will improve as these muscle groups get stronger. A strong core will also improve your posture and can help ease lower back pain. In fact, as long as you have good form, bridge exercises are generally safe for people with chronic back problems and can aid in pain management.
Step-by-Step Instructions
⦁Lie on your back with your hands at your sides, knees bent, and feet flat on the floor under your knees.
⦁Tighten your abdominal and buttock muscles by pushing your low back into the ground before you push up.
⦁Raise your hips to create a straight line from your knees to shoulders.
⦁Squeeze your core and pull your belly button back toward your spine.
⦁Hold for 20 to 30 seconds, and then return to your starting position.
This is one of the best upper body exercises because it works everything from your chest to your back, your arms and even your abs. Make sure your shoulders line up with your wrists and you tuck your elbows towards your sides (and don’t flare out your elbows wide). Try to get your chest and hips as close to the floor as possible without touching.
Pushups are a strength-building move. They primarily work your chest, shoulders, triceps, and core muscles.
They only require your body weight, so they’re also a great on-the-go move to add to your routine.
The number of calories pushups burn vary from person to person. In general, pushups can burn at least 7 calories Trusted Source per minute.
It helps protect you from lower-back pain, too.
PROPER PUSHUP FORM
⦁Get in a high plank position, with your hands a little wider than shoulder-width apart and your palms directly under your shoulders. Your body will form a straight line from your heels all the way to your neck.
⦁From this position, engage your core muscles, and pull your shoulder blades down and back.
⦁Start to lower yourself to the floor by bending your elbows and pushing your shoulders forward.
⦁From this position, engage your core muscles, and pull your shoulder blades down and back.
⦁Start to lower yourself to the floor by bending your elbows and pushing your shoulders forward.
⦁Lower down until your chest is about an inch off the ground. Pause, exhale, and push your body back to the starting position.
Therapeutic ultrasound is often used by physiotherapists to reduce pain, increase circulation and increase mobility of soft tissues. Additionally, the application of ultrasound can be helpful in the reduction of inflammation, reducing pain and the healing of injuries and wounds.
Indications Ultrasound
Ultrasound is indicated for conditions that benefit from the application of deep heat: relief of pain, muscle spasms and joint contractures. The objective of therapeutic ultrasound in the treatment of selected medical conditions associated with the chronic and sub chronic conditions of bursitis/capsulitis, epicondylitis, ligament sprains, tendinitis, scar tissue healing and muscle strain, is to reduce pain.
Contraindications
ESWL - Infection, stone burden greater than 2.5 cm; coagulopathies, untreated hypertension, pregnancy-ESWL.
MRGUS - Cardiac pacemaker or other implantable devices.
Ultrasound diathermy - Bone fracture, malignancy, arteriosclerosis, application to eye, spine, active infection or ischemic tissues
Treatment
They are many types of ultra sounds are available
They are given in below
water dub therapy
Direct method
This method is comenly apply all physiotherapiest this is a good method to treat pain
water pack therapy
etc...
YOU WANT MORE DETAILS PLS COMMAND AND SUBSCRIBE ME
Contemporary research suggests that every adult should accumulate 30 minutes or more of moderate intensity physical exercise on most, or preferably all, days of the week.
Cardiorespiratory conditioningconsists of performing aerobic exercise, which requires oxygen to sustain muscle activity and anaerobic exercise, which does not use oxygen for short bursts of intense actions.
Your 'maximal aerobic capacity' or oxygen uptake, is the best indicator of how much work you can sustain without fatigue.
'Active recovery' involves exercising at 30% to 50% of maximal capacity, for 5 to 10 minutes after a strenuous workout.
Everyone has a threshold at which the balance between aerobic and anaerobic energy systems begins to favor the anaerobic; your muscles cannot extract enough oxygen to produce the required energy. This is called anaerobic thresholdand can be monitored by the accumulation of lactate in the blood.
Running, cycling, cross-country skiing, and rowing are all excellent methods of improving cardiorespiratory fitness.
Tempo paceis the lactate threshold pace, or the maximum speed you can run comfortably at for about an hour.
Too many distance runners don't sprint. Fast running at 95%+ of maximum speed, helps develop a more efficient and powerful stride by recruiting more fast-twitch muscle fibers.
Hill running is an effective form of strength training. By using gravity (your weight) and the grade of the hill, you significantly improve muscle strength and cardiorespiratory capacity.
Hill sprints are an effective injury prevention tool and should be included in the weekly training program of competitive runners.
Cardiovascular fitness, aerobic capacity and endurance are all terms used to describe the body's ability to sustain exercise over a period of time. Exercise designed to increase cardiovascular fitness is often termed 'aerobic exercise' as sustained exercise uses the aerobic pathways of oxidative phosphorylation for energy supply and training adaptations result in a more efficient aerobic energy pathway. Such exercise generally
targets large muscle groups and aims to overload the cardiovascular system, thus increasing heart rate and respiratory rate during exercise.
must be delivered to the lungs by adequate ventilation,
and thenmust pass into the blood at the alveolar level.
The physiological training adaptations that take place following aerobic training can be divided into local adaptations, seen in the muscles used during the training exercises, and systemic adaptations. These physiological adaptations are seen approximately 6 weeks into a training programme. Performance in exercise tests may improve before physiological adaptations are detectable, and this may be due to other factors such as improved skill in task performance and increased confidence during exercise.
Exercise to Increase Cardiovascular Fit
ness
Local training adaptations
Local adaptations occur in trained skeletal muscles which enable Ihem to uptake and utilize oxygen more efficiently. These adaptations are as follows.
Capillaries.
1\11 increase in the number and size of capillaries within the trained Illuscle, providing a greater surface area for delivery of oxygen and removal of waste products by the blood.
Mitochondria
An increase in both the size and number of mitochondria in all skeletal muscle fibre types within the trained muscle. This increase in mitochondrial material also results in a doubl ing of the oxidative enzymes, thus increasing the capacity to produce adenosine triphosphate (ATP) using the aerobic pathways.
Lipolysis
An increase in lipolysis, resulting in a greater use of fatty acid Illl energy supply.
Muscle fibre type
There is some evidence to suggest that aerobic training leads to COI1version from type 2 to type 1 muscle fibres.
The left ventricle increases in size and thickness. This results in greater end-diastolic volume and stroke volume. The increase in stroke volume leads to a decrease in resting heart rate and heart rate du ri ng sub-maxi mal exercise.
Plasma volume
An increase in plasma volume leads to a greater circulatOlY reserve. This allows blood to be redistributed for increased delivery to exercising muscle and temperature regulation.
When designing an exercise programme to increase cardiovascular fitness the following principles should be considered,
Energy source The exercise duration should be long enough for the aerobic pathways to become the main source of energy production, which occurs after approximately 5 minutes of exercise.
Rhythmical Cardiovascular exercises rhythmical in nature.
use large muscle groups are often
Specificity Although cardiovascular training has systemic effects that contribute to an overall increase in exercise capacity, it is also muscle-and taskspecific. Therefore the exercises should be designed with individual patient goals in mind,
Range of exercises For the greatest training effect both upper and lower limb activities should be included in the programme of exercise. If using a variety of eKercises it is desirable to alternate the emphasis 011 particular muscle groups when sequencing the exercises to avoid local muscle fatigue; for example adding a 'lhrowing and catching' exercise in between 'sit to stand' and 'stair climbing' allows the quadriceps to recover. The exercise programme may be one continuous activity, such as jogging, or comprise a combination of eKercises such as
circuit training.
Intensity level When designing a circuit, care should be taken to ensure that the heart rate is maintained within the required parameters for training during all activities, although there may be a combination of high-and lowerintensity activity throughout the circuit. Using a range of exercises at different training intensities allows recovery periods in between bursts of higher-intensity activity. i\ baseline level of aClivily should be maintained to prevent rapid decreases in heart rate (see Cool down).
Safety
Belore prescribing a cardiovascular exercise programme the person's cardiovascular system should he assessed and safe limits of CKcrcise clearly set. Healthy individuals can exercise within the normal guidelines, but individuals with respiratory, cardiac or circulatory disorders could become severely compromised by the stress placed on their cardiovascular system, and they should be carefully assessed
Exercise to Increase Cardiovascular Fitness
specific levels of activity applied. It is good practice to monitor Ihe heart rate during the exercises whilst under supervision of the physiotherapist to check for any unexpected response to exercise, before instructing the person to carry out the exercises in an
unsupervised
environment. Activities that include a jumping, running or bouncing component are classed as high impact and will be of higher intensity. There is an increased risk of injUly with high-impact exercise and it may not be appropriate for some people, in which case the activity should be modified to remove the jump component.
WARM UP AND COOL DOWN
A warm up and cool down should always be incorporated into a cardiovascular training routine.
Warm up
A warm up may comprise exercises that are included in the exercise programme ilself, bUl should starl at a low intensity and gradually build up to the required training intensity over a period of 10 minutes. This is to allow a gradual redistribution of blood to the exercising
muscles, in particular the cardiac muscle.
Cool down
A period of around 10 minutes, during which the intensity of exercise is gradually reduced, is important immediately following exercise. This cool-down period maintains muscle contraction of the exercised musrlfs, which aids the redistrihution of hlood after exercise and prevents blood pooling in the peripheralmuscIes, which can lead to fainting.
Therefore the main purpose of the warm up and cool down is the gradual change in heart rate and the redistribution of blood. Warm up is often seen as essential for injury prevention, and then:: is some evidence in the literature to suggest that warm muscles are less vulnerable to injury as they have increased extensibility.
Stretching is often incorporated into the warm up and cool down; however stretching before exercise can reduce performance and has little effc'ct on injury (Stone 2006).
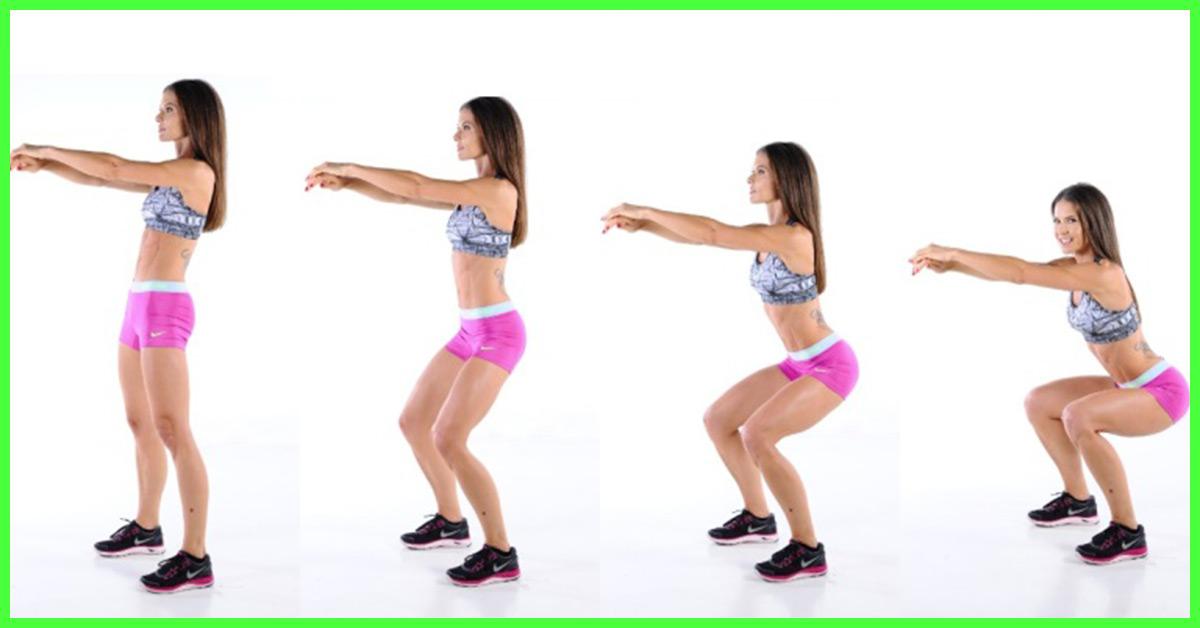
Squat best fitness exercise for our body this very very important exercise
fit in lower back
Step 1
Starting Position: Begin standing with your feet slightly wider than hip-width and your toes turned out slightly. Your hands are by your sides with your palms facing inward. Pull the shoulders down your back toward your hips.
Step 2
Engage your abdominal/core muscles to stabilize your spine (“bracing”). Keep your chest lifted and your chin parallel to the floor. Shift your weight back into your heels as your hips begin to push toward the wall behind you.
Step 3
Downward Phase: Begin this phase by hinging at the hips, shifting them back and down. Your hips and knees bend simultaneously. As you lower your hips the knees bend and will start to shift forward slowly. Try to prevent your knees from traveling too far forward past the toes. Keep the abdominals/core muscles engaged and try to keep your back flat (do not tuck the tail or arch the low back).
Step 4
Continue to lower yourself until your thighs are parallel or almost parallel to the floor. If your heels begin to lift off the floor or your torso begins to round, return to start position. Be aware of any movement that may occur at your feet, ankles and knees. Work to ensure that the feet do not move, the ankles do not collapse in or out and the knees remain lined up with the second toe.
Step 5
From the Lowered Position: Keep the knees aligned with the second toe and body weight evenly distributed between the balls and heels of both feet. If you can view this from the side, your shinbone should be parallel with your torso and the low back should appear flat or may be showing the beginning of some rounding.
Step 6
Upward Phase: While maintaining the position of your back, chest and head and with the abdominals engaged, exhale and return to start position by pushing your feet into the floor through your heels. The hips and torso should rise together. Keep the heels flat on the floor and knees aligned with the second toe. Think about inhaling on the way down and exhaling while exerting on the way back to the initial standing position.
Briefy explain to the patient what the examination involves
Ask the patient to remove their bottom clothing, exposing the hip
Offer the patient a chaperone, as necessary
Always start with inspection and proceed as below unless instructed otherwise; be prepared to be instructed to move on quickly to certain sections by the examiner.
Inspection
Introduce yourself to the patient
Wash your hands
Whilst the patient is standing:
Assess patient gait, such as
Trendelenburg gait
– caused by dysfunction of the hip abductors (gluteus medius and minimus), the patients contralateral hip drops when walking; the patient often offsets this by leaning their trunk toward the affected hip
Antalgic
– produced from weight bearing on painful leg, resulting in a shortened stance-phase and producing the characteristic ‘limping’ patient
Examine for quadriceps muscle bulk
Ask the patient to lie supine on the bed:
Assess for:
Skin changes (uncommon in primary hip pathology as the joint is deep)
Scars (indicative of previous surgery)
Swelling (also uncommon, as the joint is deep)
Measure leg length with a tape measure. This assesses whether there is an actual leg length discrepancy and whether there is any pelvic tilt present to compensate for this:
True leg length = ASIS to medial malleolus
Apparent leg length = pubic symphysis to medial malleolus
Palpate
Assess for temperature
Feel for trochanteric bursa tenderness
Palpate over the greater trochanter
Movement
All movements are passive when examining the hip, ensuring to note any pain, the range of motion, and any crepitus.
Abduction and adduction
Place one hand across the patient’s pelvis to ensure that the pelvis remains still and that the movement is coming from the hip joint and not the pelvis
Flexion and extension
Internal and external rotation (assessed with the hip flexed)
Special Tests
Thomas’ Test (assesses for fixed flexion deformity)
Have patient lying in the supine position, and place one hand underneath the patients lumbar spine to ensure loss of the lumbar lordosis
Fully flex the contralateral hip and observe the ipsilateral hip (i.e. the one that you are examining). Any flexion in this hip suggests a fixed flexion deformity. Repeat this test on both sides
Trendelenburg test (assesses abductor muscle function)*
Ask patient to place their hands on your outstretched hands (for stability) and ask them to stand on the leg that you are examining, lifting the contralateral leg off the ground (for 30 seconds).
Feel for a drop in the pelvis on the contralateral side. If there is abductor pathology (gluteus medius and minimus) on the side you are examining then the contralateral side (the normal side) will sag down (“Sound Side Sags”)
Briefly explain to the patient what the examination involves
Ask the patients to place their hands on a pillow
Always start with inspection and proceed as below unless instructed otherwise; be prepared to be instructed to move on quickly to certain sections by the examiner.
Inspection
Ask the patient to pronate their hands
Inspect for pathology in the:
Nails
Heberdens (DIPJ) or Bouchards (PIPJ) nodes (present in osteoarthritis)
Dorsum of the hand
Check the rotational axis of each finger (look from the tips of the fingers) to assess for any rotational deformity
Ask the patient to supinate their hands
Assess for any obvious pathology in the palms (e.g. Dupuytren’s contractures)
Ask the patient to flex their elbows and show you their elbows / dorsal surface of their forearms
Check for psoriatic plaques, rheumatoid nodules, or gouty tophi
Palpation
Ask the patient to again place their hands back on the pillow, in a supine position:
Assess temperature
Using the dorsal surface of your own hand,
feel distal to proximal along the patient’s hand
and forearm, and compare
with the contralateral side
Feel for the radial pulse
Assess the muscle bulk of the thenar
eminence and hypothenar eminence
Run the pad of your thumb firmly over these areas
Compare for asymmetry, caused commonly by disuse or denervation
(i.e. carpal tunnel syndrome)
Assess the tendons of the hand, feeling for nodules or contractures
Ask the patient to pronate their hands:
Palpate the bony anatomy of the hands, feeling for any tenderness
The radial and ulnar styloid processes
The carpal bones
Along the length of each metacarpal
Gently squeeze all 4 MCP joints together (often painful in inflammatory arthropathies)
Bimanually palpate all of the MCP joints, PIP joints, and DIP joints
This is best done by placing the thumb and index finger around the joint in a pincer like grip, and the other hand the same at 90o to the first hand, feeling for tenderness and laxity in the joint
Movement
Ask the patient to keep the hands in the pronated position:
Check the extensors of the hand, asking the patient to
Extend the wrist against resistance (extensors)
Raise the thumb off of the pillow (EPL)
Hold the wrist passively in extension and ask the patient to extend their fingers (ED)
Flex the fingers to 90oat the MCP joints and ask the patient to extend their fingers again (lumbricals)
Ask the patient to supinate the hands:
Check the flexors of the hand, asking the patient to
Flex the wrist against resistance
Flex the fingers at the PIP joints
Isolate the 3 fingers that are not being tested (simply hold them in the natural anatomical position) and ask the patient to flex the finger being tested (FDS)
Flex the fingers at the DIP joints
Isolate the proximal and middle phalanges by holding them firmly and then asking the patient to flex the distal phalynx of that finger (FDP)
Check the action of the wrists, asking the patient
Abduct their wrists against resistance
Adduct their wrists against resistance
Check the action of the thumbs, asking the patient to
Flex the thumb (FPL)
Abduction the thumb (APL and APB)
Adduction the thumb (AP)
Opposition the thumb (OP)
Assess the functioning of the hand by assessing:
Power grip
Place two fingers in to the patient’s palm and ask them to squeeze as firmly as possible
Pincer grip
Ask the patient to pinch the tip of you finger
Fine motor function
Ask the patient to pick up a penny or do up the buttons on a shirt
Check the sensorimotor function of the terminal branches of the brachial plexus*:
Median nerve
Motor – confirm thumb abduction is present (tests APB)
Sensation – check at the radial border of tip of index finger
Radial nerve
Motor – confirm MCPJ extension is present (tests ED)
Sensation – check at the dorsal surface of first digital web space
Ulnar nerve
Motor – confirm finger abduction & adduction (tests palmar and dorsal interossei)
Sensation – check at the ulnar border of tip of little finger
Assess the vascular status of the hand by assessing:
Colour / temperature / capillary refill time
*In the context of trauma, a different assessment is performed, assessing each aspect of the brachial plexus in turn
Special Tests
Phalen’s Test (test for carpal tunnel syndrome)
Ask the patient to place the dorsal surfaces of their hands together and then fully flex the wrists (the ‘reverse prayer’). Hold for 30–60 seconds. This will reproduce their symptoms in positive cases
Tinel’s Test (test for carpal tunnel syndrome)
Gently percuss over the volar aspect of the carpal tunnel – this is found just distal to the wrist crease, overlying the carpal bones. In a positive test, the patient will report paraesthesia in the distribution of the median nerve
Finkelstein’s Test (test for DeQuervain’s Tenosynovitis)
The thumb is flexed across the palm and the fingers are then wrapped around it. The wrist is then passively adducted (or ulnar deviated). This causes a disproportionate amount of pain over the radial styloid on the affected side
Assess again by running down with the pad of your thumb
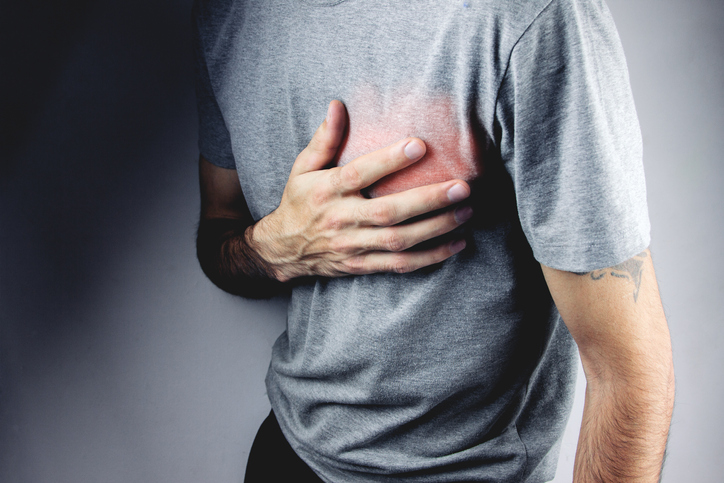
The cardiovascular system can be thought of as the transport system of the body. This system has three main components: the heart, the blood vessel and the blood itself. The heart is the system's pump and the blood vessels are like the delivery routes
There are many types of heart disease that affect different parts of the organ and occur in different ways.
Heart attack
Arrhythmia. ...
Coronary artery disease. ...
Dilated cardiomyopathy. ...
Myocardial infarction. ...
Heart failure. ...
Hypertrophic cardiomyopathy. ...
Mitral regurgitation.
Congenital heart disease..
Symptoms can include:
Chestpain,chesttightness,
chestpressure and
chestdiscomfort (angina)
Shortness of breath.
Pain, numbness, weakness or coldness in your legs or arms if the blood vessels in those parts of your body are narrowed.
Cardiac cycle
Pain in the neck, jaw, throat, upper abdomen or back.
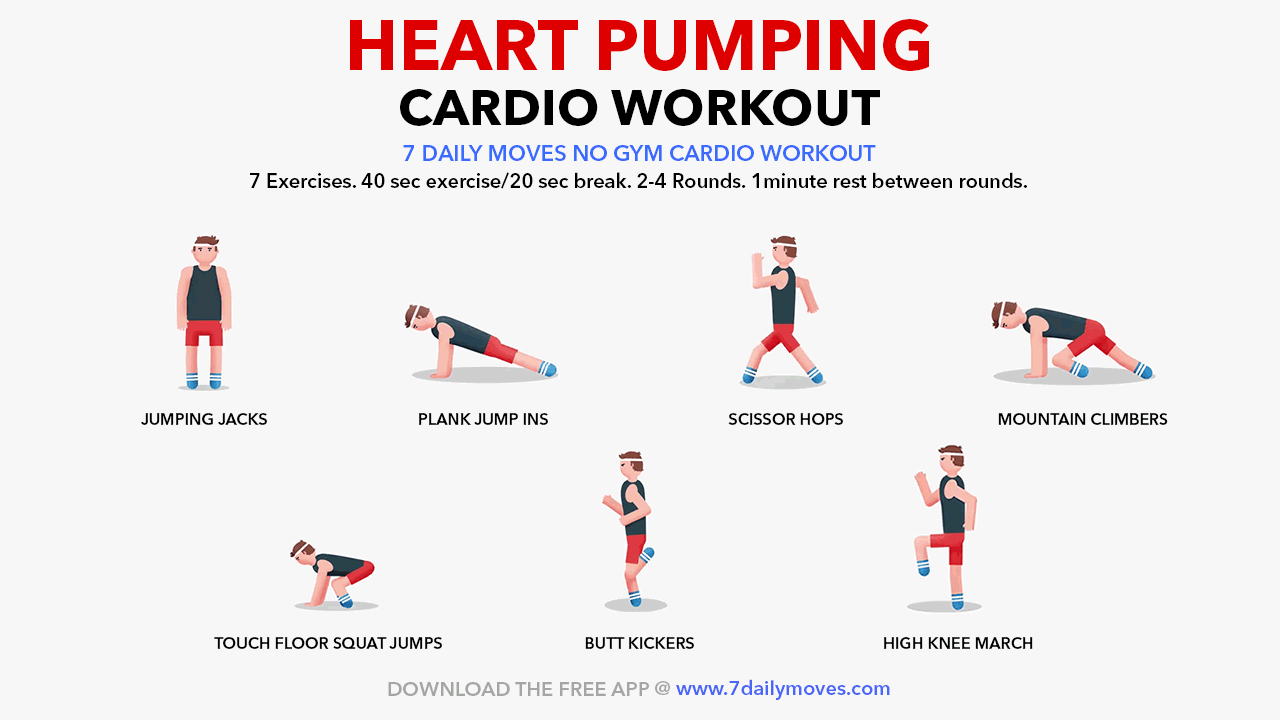
cardiac exercise
Cardio Workout: The Five-Minute Cardio Blast Workout ...


4.png)


/Squat_annotated-35163d5f572948bd892f4e4628571f41.jpg)